Showing posts with label Tutorials. Show all posts

Friday, April 08, 2011

{ Personalized Clay Easter Eggs ---A Tutorial }


Here is the tutorial I promised for making these stinking cute eggs. 
I will add tips to the bottom of this post that I found helped me out while making these. 
Thanks to my girl's Kim & Nanette for egging with me! ;)

Supplies you will need:
clay
smooth cup to roll out clay
knife
rubber letter stamps
sharpie
tin foil
3 inch peat moss cup for the pail
you can get these in any garden center. I got a pack of 14 for $1.50
ribbon
office hole punch
Click on the pictures to enlarge them
my egg's were about 1 1/4 inches long
Tips:
 1. What clay did I use? Sculpey Clay.

2. To Make the Robin Egg Blue Color; 
Mix a lot of White clay with a little Cobalt Blue & a tiny amount of Yellow. I rolled my eggs out with a solid plastic cup.
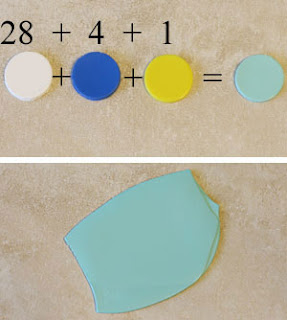
photo from: http://www.polymerclayweb.com/eggs.asp  
3. After wrapping the foil to help smooth out the clay (remove finger prints) set the egg aside and let it cool as the heat from your hands makes it a little too soft. After a few minutes you should be able to smooth out the clay by running your fingers along the length of the egg. If you find you have foil showing just add a little ball of clay over that spot and smooth out or remove and start over. I had to start over a couple times......

4. Stamping the egg: 
Again, let it cool a little and using any rubber stamp lightly stamp each egg. I found that the stamp needed to be a little wet, so I used a wet wipe and just stamped on it - then stamped the letter on the clay. It will help the stamp NOT STICK to the clay.

5. Before baking it's a good idea to pierce it with a pin in a few inconspicuous places. This allows a way for trapped air to escape during baking. Sometimes it will form a mole like shape as the air has no where to go, yes I had this happen to some of my name eggs and I can tell you 
YOU DO NOT WANT A TUMOR ON YOUR EGG!
 (I didn't do this on all my eggs but better to be safe then sorry) You can speckle your eggs with a little watered down brown Tole paint & an old tooth brush and the tiny pin holes will blend in with the rest of the speckles.

6. Coloring in the letters: if you happen to goof like I did and accidentally get sharpie "outside" the lines. Take a tiny piece of FINE GRIT sandpaper and sand it ever so lightly off. You can use any color Sharpie, I wanted to use brown but I only had a fine tipped Black pen.  

7. To make the Pail:
I use a Peat Moss Pot from Wal-Mart, filled with what ever filling you want then using a handheld office hole punch, punch 2 holes in the sides of the pot and add some ribbon for the handle. 

Inspiration for these eggs came from here

Here are eggs I did for my family: 
If you have any other ?'s feel free to email me.

I linked up with:

Pin It

Thursday, February 10, 2011

{ Felt Pinked Valentine Heart - A Tutorial }

I finally finished my Felt Valentine Heart!! I ended up folding my circles a little differently than other tutorials I have found.. Lets just say it's more compact by design, I like to think of it as the 
Mini Cooper of Valentine Hearts.
I love how it turned out and it was cheap, no frugal! 
Like $5 smackers frugal, ya gotta love that. :)
FREE Love One Another Print found HERE
Thanks for reading.
Sorry for the double post, my blog went all wacko on me.


Pin It

Saturday, October 02, 2010

{ Framed Black Crow --- EASY Mini Tutorial }

I've had this craft in my head for the past couple weeks and finally got around to making them a couple days ago. They are not only cute, but they super fast & EASY to make, mine only cost around $1.25 you gotta love that price tag!

Supplies:
Black Dollar Tree Crow
Misc frame of your choice
Scrapbook paper (I printed mine from home)
Hot glue gun


 See told you it was easy!

 
Pin It

Saturday, August 07, 2010

{ Baby Bjorn Carrier Cover Tutorial EASY }

I made this Baby Bjorn Carrier Cover over 2 years ago and I'm still getting emails on how I made it.
So needless to say this tutorial is long over due. I had loaned this carrier to someone and now that I have it back here is what I did step by step.
Keep in mind I'm no seamstress.... :)


Sorry I don't have any sewing pictures but trust me if I could make this then you know it's E.A.S.Y.


I would recommend using some cheap o' fabric first if you're nervous about sewing one of these together, then you can make your adjustments on it. Let's just call it your test cover. And as luck would have it I still had my test cover and here it is in all it's sad glory.


Supplies needed:
Fabric, fabric pen, sewing machine, scissors, baby carrier.


 Take straps off baby carrier and lay flat on your fabric.
Trace around your carrier with a fabric pen on wrong side of fabric, make sure to leave a 1/2 seam allowance between the carrier and your pen mark. As you can see on my tester I have a little more than 1/2 in some areas. Ignore that fact.
Place your traced fabric on top of your second piece of fabric right sides together then pin & cut your pattern out.

Unpin & hem the edges where the straps go through.
Pin your fabrics together again making sure you line up all your strap openings.
Sew around your cover.
Clip around all corners being careful not to clip your seam.
Then I turned it right side out and ironed it.

 Roll up your carrier like a crepe & stuff the carrier in one of the large side strap openings and adjust your carrier inside to fit. It's a tight fit but it works.

TIP: If you find some of your seams aren't very tight such it's too loose by the straps just take it off and sew around that curve a little more. 
I had to do it to 2 of mine.

 I also would recommend sewing a zig-zag stitch around all your edges just to help finish it off and strengthen your seams.

After you have your seams how you like them place carrier back inside and you are good to go!
I'm all about slip covers as I have them on my Ikea furniture and having them on this cover was a blessing as you can just remove it and throw it in the wash if it gets dirty.


Hope this tutorial helps!

Have a Fabulous Weekend!

Pin It

Thursday, February 11, 2010

{ Tutorial- A Valentine Fabric Heart Candle Stick }

Valentine's Fabric Heart Candle Stick
Tutorial
I was doing my visiting teaching a few weeks ago and saw a candle stick like this at one of my gal's homes. 
I thought it was cute enough to reproduce and this is what I came up with.


1. Supplies: Dollar Tree Glass Candle Stick Holder, Scrap Fabric, Old Buttons, Lace, Glue gun, Fiberloft Stuffing, Sewing machine, Embroidery floss, Ric Rac, (you can use what ever you want) & Tea for staining.
1. Free hand a heart on your fabric and cut out. I used a fabric pen to draw on my fabric. MAKE SURE YOU WIDEN THE BOTTOM OF THE HEART so it will fit over the rim of the candle stick holder. As show in below photo.
2. Sew around your heart, then clip all your curves.
3. Tea stain and then stuff your out (pun intended).
Cheesy I know, but it's late.
4. Then baste stitch with 6 strands of embroidery floss around the base of your heart. I only used 4 but recommend 6, I'm just saying....
5. Hot glue a little stuffing in your candle stick holder.
6. Then put your stuffed heart on the candle base and pull your basting strings to tighten fabric around neck of candle stick. Tie it off tight. I would have added a picture here but sadly I only have 2 hands.
I even added a little dab of hot glue to make sure my knot wouldn't go anywhere. Then cut off any excess fabric below your knot.

7. Next hot glue - Tea Stained lace (or ric rac) around base to hide your fabric line. Next time I will not make the lace tight around the base I'm going to make it Pleated.
You know, a dab of glue, pleat, a dab of glue, pleat... Pleat and repeat. :)

7. Cut out another smaller & hand stitch around it, then attach to main heart with hot glue, because you know everything is better with glue.....
8. And last but not least sew on a few buttons and you are done!
Total cost for my Heart Candle Stick: Around $2.00 if that. :)
I plan on making at least 2 more, but using different heart shapes so they will all be at different heights.
Sorry if this isn't much of a tutorial, I hope you could understand the steps as I'm pretty sure they are as clear as mud.
Okay I'm all ♥'ed out, I better catch some shut eye!
Have A Happy Thursday!


Pin It

Monday, January 11, 2010

{ CTR Towel Quick Tutorial }

I got this fabulous little idea from my Friend Hilary's blog- sorry ladies she's private, but she is ever so crafty and just as nice on the phone as she is on her blog! So Thanks Hilary!! With Brinley's baptism this coming Saturday I thought this would be a fun little gift for her. I made a second for our cousin's little girl who's baptism is the next day.

Supply list:
White Bath Towel
fabric of your choice
(I would stray away from prints with white, makes it hard to see on the towel)
Wonder Under
Sewing Pins
Iron
Sewing machine
CTR Pattern is just a Coloring Page, just Google it to find one and print it out.
Baptism Towel Poem- link- HERE

These would even make a great birthday gift with their name or shape on it
(princess crown, truck whatever!)
Oh the possibilities are endless!

1. Iron the Wonder Under to the wrong side or your fabric.
2. Then pin your pattern to your fabric and cut out.
3. Peel off paper backing and iron pattern onto towel.
4. Stitch around entire pattern.
5. Done!! I love quick and easy gift/crafts!
Here is the link to the Poem that I used to attach to our towels.

Pin It

Thursday, November 12, 2009

{ Easy Pottery Barn Inspired Christmas Wreath Tutorial-DIY }

Here is my attempt at the Pottery Barn Wreath that I posted about below. I already had the wreath and I spent $4 dollars on balls, & twisty tie line all from the Dollar Tree.This price is so much better than the $79.00 that Pottery Barn is asking! Granted I don't have the fancy hanger, but mine will be hung on the outside of my windows so I don't mind.

Image Via Pottery Barn

Gather your supplies.
Loop the twist tie through your ornament, I didn't bother gluing the caps on the balls as they were already pretty tight. Just check yours as you go.
Place your ball on the wreath and fish your loop though the wreath to the metal framing on the back & twist them so they are secure,
so E.A.S.Y.
And just keep adding until your happy with the results.
Until you have this...... Isn't she pretty!


I love it! Especially the $4.00 dollar price tag, thanks for the inspiration Pottery Barn! 
If you make these I would love to see your final product, so please share!
Pin It

LinkWithin

Related Posts with Thumbnails