Thursday, April 28, 2011

{ Pressed Peonies WINNER! }

Here is the winner of the 3 Pressed Peonies!
The Mrs. said...
HAPPY BIRTHDAY!!! i LOVE these peonies! I want to put them on a belt to wear with a little black dress! This last year for my birthday, hubby and I (fiance at the time) stayed in watching movies and eating junk food in bed :)
Congrats to The Mrs.!
Please contact me via email over on the right and we can talk colors an such!

Thanks so much for your patience!


PS. The Mother of the Bride LOVED the bouquet!
Hopefully I can get a good picture of it when they return.
Pin It

Wednesday, April 27, 2011

{ TBA }

The Winner of the Pressed Peonies will be announced  tomorrow, I am knee deep in trying get one of these finished, well a version of it.
Yes I am making a Feather Bridal Bouquet for a Friend and she 
(the bouquet) has a deadline.
Sorry for the delay, 
I will return shortly. :)
Pin It

Sunday, April 24, 2011

{ Happy Easter }

SOURCE
Happy Easter to all!
Pin It

Saturday, April 23, 2011

{ 36 & A Giveaway }

Today I am 36.  
It's officially here.....
Today will be spent cleaning and working outside.
Sounds like the perfect way to celebrate a birthday don't ya think?!

In honor of the big 3.6.
 I will be giving away 3 Pressed Peonies of your color choice to 1 of my lucky and awesome readers!
All you have to do is leave a comment telling me what you did on your last birthday. 
Easy as Birthday Cake!

Well, duty calls I better get back to work!
Good Luck & have a Fabulous Weekend!

Giveaway will close on 4/26/11
Pin It

Thursday, April 21, 2011

{ All Things Egg }

It's yet one more post about eggs, can ya stand it? :)
And all I can say is I wish I had found these sooner!
I was browsing over at Roots and Wings Co and found this post for these stinking cute Boiled Egg Molds. I mean come on what's not to love about these?!
So easy to use!

To use your egg mold, just follow these steps:
           1. Boil an egg and remove the shell while still hot
2. Put the hot egg into the mold - squeeze hard until the mold can click shut.
3. Put the mold with the egg into cold water or the refrigerator for about 5 to 10 minutes
4. Take out the egg and you will see a Cute Bear (or bunny) Egg!!!
I love little stuff like this
I found several on eBay and I just
might have to....okay I already did...... make the purchase as my little people would love making these. Plus we will use these all year round, 
who said Cute Eggs are only for Easter? :)
Pin It

Friday, April 08, 2011

{ Personalized Clay Easter Eggs ---A Tutorial }


Here is the tutorial I promised for making these stinking cute eggs. 
I will add tips to the bottom of this post that I found helped me out while making these. 
Thanks to my girl's Kim & Nanette for egging with me! ;)

Supplies you will need:
clay
smooth cup to roll out clay
knife
rubber letter stamps
sharpie
tin foil
3 inch peat moss cup for the pail
you can get these in any garden center. I got a pack of 14 for $1.50
ribbon
office hole punch
Click on the pictures to enlarge them
my egg's were about 1 1/4 inches long
Tips:
 1. What clay did I use? Sculpey Clay.

2. To Make the Robin Egg Blue Color; 
Mix a lot of White clay with a little Cobalt Blue & a tiny amount of Yellow. I rolled my eggs out with a solid plastic cup.
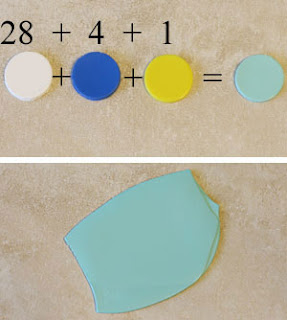
photo from: http://www.polymerclayweb.com/eggs.asp  
3. After wrapping the foil to help smooth out the clay (remove finger prints) set the egg aside and let it cool as the heat from your hands makes it a little too soft. After a few minutes you should be able to smooth out the clay by running your fingers along the length of the egg. If you find you have foil showing just add a little ball of clay over that spot and smooth out or remove and start over. I had to start over a couple times......

4. Stamping the egg: 
Again, let it cool a little and using any rubber stamp lightly stamp each egg. I found that the stamp needed to be a little wet, so I used a wet wipe and just stamped on it - then stamped the letter on the clay. It will help the stamp NOT STICK to the clay.

5. Before baking it's a good idea to pierce it with a pin in a few inconspicuous places. This allows a way for trapped air to escape during baking. Sometimes it will form a mole like shape as the air has no where to go, yes I had this happen to some of my name eggs and I can tell you 
YOU DO NOT WANT A TUMOR ON YOUR EGG!
 (I didn't do this on all my eggs but better to be safe then sorry) You can speckle your eggs with a little watered down brown Tole paint & an old tooth brush and the tiny pin holes will blend in with the rest of the speckles.

6. Coloring in the letters: if you happen to goof like I did and accidentally get sharpie "outside" the lines. Take a tiny piece of FINE GRIT sandpaper and sand it ever so lightly off. You can use any color Sharpie, I wanted to use brown but I only had a fine tipped Black pen.  

7. To make the Pail:
I use a Peat Moss Pot from Wal-Mart, filled with what ever filling you want then using a handheld office hole punch, punch 2 holes in the sides of the pot and add some ribbon for the handle. 

Inspiration for these eggs came from here

Here are eggs I did for my family: 
If you have any other ?'s feel free to email me.

I linked up with:

Pin It

{ Cotton Corner Winner!!! }

9. McKenzie said... Those ankle booties are SO cute!
 
Congratulations McKenzie please email Kim by 4.10.11 at the following:
k8isaacson at gmail DOT com
Pin It

LinkWithin

Related Posts with Thumbnails